Showing posts with label DIY. Show all posts

Thursday, 22 January 2015

Henry's dedication.

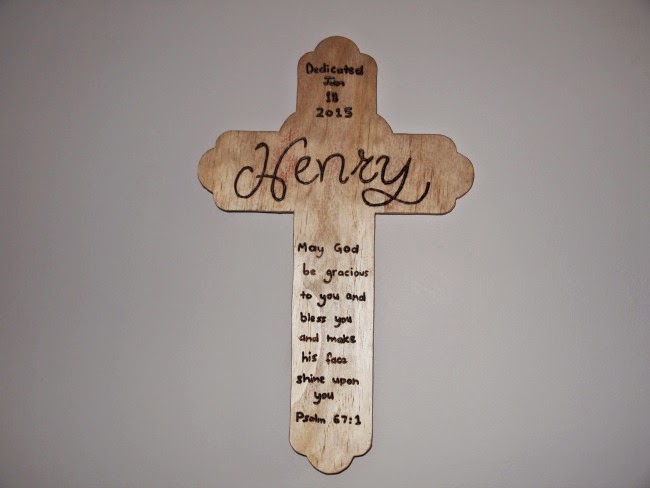
My husband and I are practicing Christians and had a dedication ceremony for our son, Henry, recently. A dedication is a chance to declare our intent to raise our child as a Christian. It was a special day for our family and I wanted to make Henry a little cross to remind him. I used an existing cross that I had and my dad helped to cut out the cross shape once the lettering had been done.

To make a cross (or other shape) similar to this you will need:
a pencil
a cross shape template
a piece of plywood
a soldering iron
a fretsaw (or someone kind to cut it out for you)
sandpaper


Once I had decided what I wanted it to say I wrote it out in pencil. I have average handwriting but it is a special handmade item for Henry from me. Once I was happy with the text I used a soldering iron to write over the pencil and burn the text into the wood. Since the verse I'd chosen was quite long it took a few hours but is a fairly therapeutic peaceful activity to do while baby sleeps.

My dad cut out the shape for me and we added a hook on the back to hang it with.I hope we can use the cross with Henry when he's older to discuss the meaning and reason behind his dedication. I've also included a few other photos of decorations from the day. They're fairly basic decorations as I'm time poor at the moment but added to the special feel of the day.


Lisa x

Friday, 9 January 2015

Master bedroom makeover.

The master bedroom was one room that needed to be fixed up before Henry was born as he sleeps in a cradle in our bedroom and also has a feeding chair in our room.
Our master bedroom is a great size with a connecting walk through wardrobe which leads to a bathroom. For now the walk through wardrobe is staying the same but there's a door to close off and then I wanted to have a tranquil, neat and clean master bedroom. I decided to get a bit more adventurous than my usual love of white walls and below shows the pale green walls were started with.

This before photo is what the room looked like with the old owners furniture. While the room looks in okay condition there were actually cracks everywhere and the curtains were threadbare see through curtains that hadn't even been hemmed and just trapped dust. It did not in anyway feel like a master bedroom although it had a nice sized walk through robe and is actually quite a large room.
Here are some before snaps with our furniture in it which also shows the condition of the bedroom walls.

We decided to work with a few existing items we already had. Husband and I had purchased a four part bedroom suite when we were living in the country that is quite special to us so we wanted to keep our existing bed side tables, tallboy and four poster bed. The bed has a special carving in it that my Grandpa did using an image from our wedding invitations. With these furniture restrictions in place we really wanted to create a calm, peaceful and beautiful bedroom. One dresser wasn't quite enough for my large clothes collection so we also placed my recently upcycled white dresser in the room.

Although the bedroom is still not finished - especially as we are currently sharing it  with the baby, we've made some significant progress.
The first thing we tackled was the long rectangular window on the back wall. When we moved in our old ikea curtains were not a fit and the constant stream of light in our bedroom was not welcome. As the window is an odd shape we ordered a custom blind during a recent blind store sale- 30% off. The blind fills perfectly and really blocks out the light. Because of the length of the window and position of our bed in relation to the window, we are not going to have curtains.There is a second window in our bedroom which still has the old original wooden blind (pictured in the before photo) but we don't quite have the funds to replace it. The reason the bed is not centered in the window is because we needed room for Henry's cradle and also due to the placement of our walk in wardrobe and fact we have a 4 poster bed, it was the necessary position to allow us to watch our television in bed.

Then it was time to paint and this time 'antique white' (my usual choice) was just a little too safe. After buying several test posts, we settled for 'hydro' by taubmans.  It's a turquoise, grey colour. That's right, we went colourful! I think most of my previous paint choices have been fairly safe, thinking about future resale and timeless colours but since this a house we really want to make our own, it was time to get adventurous. The walls needed a fair bit of patching but thankful my dad is a patching machine. We removed all existing hooks to get a clean, fresh space but the best change was going from green crown molding and a creamy ceiling to a fresh dulux 'lime white' ceiling. It's amazing how much a white ceiling cleans up a room.

Our old furniture was then put back in place along with items we use often (like my jewellery collection). We also put up the mini hot air balloon and moved in the bassinet we got from my sister in law as well as the rocking chair that orginally was going to be in the nursery.
I also splurged and purchased some new lamps for the room. They suit the room well and I'm loving their pattern. The bases are white and simple so if we ever want to change it up again, we can simply replace the shades. The pattern also ties in with the bedcover that goes on top of my rocking chair (wooden rocking chairs are far too uncomfortable to sit in for hours of nursing and my newborn liked to feed for hours on end).


Henry has a distinctive area in the room and once he moves into his nursery, we'll work out a new use of the space. For now the room is very practical and peaceful to be in.
The lamps and rocking chair were purchased from gumtree, the pillow is from bed,bath and beyond and the bedcover on the rocking chair is from kmart. The canvas prints of Henry were made via canvas factory and the bunting was homemade.

I do have a few future ideas, the main one being to either DIY the fan or replace with something a little more interesting and modern- although it will still need to be a fan as the Australian climate begs in fans in bedrooms. For now it is a big improvement and once the baby starts sleeping through the night (please, please be soon), I'll be on my way to getting a great nights sleep.
Lisa x


Friday, 28 November 2014

Fabric scrap wreath.

To everyone in the US, Happy Thanksgiving! Here in Australia we don't celebrate thanksgiving so our next holiday is Christmas and I've already started getting into the Christmas spirit with some fun crafts.

I went to these beautiful markets with some friends on the weekend and was in awe of a gorgeous wreath made of scrap fabrics for $120. I really wanted a nice wreath for our front door but didn't have any money to splurge on one but was inspired to try and work out how to make a scrap fabric wreath of my own.
To make this wreath you will need:
a wire coathanger
fabric scraps in colours of your choice (I also used some lace)
a short length of ribbon
fake leaves*
2 fake birds*
fake holly/pinecones*
a glue gun
 *I didn't end up having to purchase any items but these could be bought from your local craft store or you could personalise your wreath using whatever you wish.

1. Cut your fabric scraps to similar lengths- I just kept cutting more until I had enough for the whole wreath. I also used pieces of lace which were so quick to cut up.
2. Twist your coat hanger to make a circle shape and tie the fabric scraps around the outside.
3.Work out an arrangement you are happy with using fake leaves/birds/holly etc. Once happy use a glue gun to stick down the pieces in place.

As a finishing touch I removed some of the berries from some plastic holly I had and now I think it's just right. I am very happy with the end result and think these would also make lovely gifts.

This wreath is super quick to make- it was done in one Henry sleep (app 1 hour).
And there you have it- a freebie wreath that looks fantastic on our front door. Bring on Christmas!
Lisa x


Monday, 23 June 2014

Nursery tour.

Finally the room is ready to share. I think this will be an evolving and changing space but I am quite pleased with the cute little room we have created. I have shared many of our diys for the nursery on the blog already so I'll be linking back to them throughout the post for anyone interested.
Our goal was to create a calm and peaceful space which used animals as a theme. I wanted to use existing items wherever possible and find colours which were gender neutral and worked with the existing green light, carpet and blind. The room already had a built in robe and sink which we decided to embrace rather than remove- click here to see how we painted the built ins.
As I am not currently working at the moment the budget for the room was very small and total cost for the makeover were around $500 including all the purchasing of materials and furniture. This meant I looked around lots for the cheapest and best supplies but even with our tight budget we did not compromise on quality. Everything we purchased was well made and doing lots of diy projects meant that we finished each project off to the best of our ability. We are fortunate to have parents and a grandpa who happen to be quite handy and can help with lots of these diy projects. I've taken lots of photos of the room which was the first completely finished space in our home.


The details:
The cot is a tasman eco sienna cot and converts to a toddler bed for when baby is older so it should get plenty of use. We purchased it second hand off gumtree relatively new as it's still under it's five year warranty. We chose this cot as it was highly recommended on choice as being very safe.
The change table and rocking chair were also bought second hand off gumtree and the lamp table was a diy project. The lamp was a thrifted lamp that I updated. The cloud shelf above the change table was made by my grandpa, as was the framed box shelf and elephant bookends. The mirror, pin board, "for this child I prayed" artwork and giraffe canvas were diy projects. I also sewed the quilt, pillow and elephant toy.
The hooks in the room were all thrifted, as was the hanging basket and umbrellas.
All other items were already owned except the "sophie the giraffe" which was the first item I purchased when I found out I was expecting...I've just got a little thing for giraffes.

This room is just what I wanted and more and I hope many beautiful memories will be made in this space.  I loved doing lots of diys for the room and making a special room filled with love and unique items.
Thanks for reading through my nursery tour.
Lisa x


Wednesday, 11 June 2014

Learning to knit.

This post is a very long time in the making...knitting a blanket is time consuming! When a friend offered to help me learn how to knit, I snapped up the offer and decided to make my own little baby blanket for the pram. Knitting is something completely new for me so I was keen to get some help.
I choose 4 colours of baby wool (4 ply) for the blanket- pale grey, light yellow, white and a white,yellow, mint green mixed wool. I also bought a row counter and some 3.25 mm needles.
Having never knitted before, the whole starting experience was full of mistakes and restarting again and again. Each of my squares were 25 stitches across and 45 rows long. I  originally thought I needed to knit 20 squares (which would take this new knitter a very long time) but after researching good sized cot blankets, I realised I was going to need 99 SQUARES!- 11 squares x 9 squares.
But thankfully the more I knitted, the faster I got and it wasn't too long before I had a big old pile of squares, although let's be honest, it really took forever! Knitting is far more time consuming than sewing but I was feeling determined to have finished as much as possible of the blanket before the baby comes.
Once I started to get enough squares, I then had to learn how to sew the pieces together. This wasn't especially hard but quite time consuming. I used the excess leftover wool on each of the square ends to sew it together and hoped the colour I was using worked okay against the different colours. It wasn't perfect but it still looks good, just with a homemade edge :)
And this labor of love was finished. I actually  have ended up with a blanket that is 7 rows x 9 rows but there is always the possibility of extending the blanket to the originally planned 11x9 squares in the future.


My dear Mum saw me knitting lots and decided to knit me a scarf for this winter in my favourite mustard yellow colour..something bright and cheerful to wear over the long, cold months ahead :) This was very sweet of Mum and she just used wool from my wool stash. For interest sake this scarf was 55 stitches across and the length was two balls of mustard wool I had sitting in my craft room. However Mum decided to knit it one row purl, one row knit and unfortunately this ended up with the scarf curling up. This resulted in me consulting google and eventually finding the solution...
Wet the knitted scarf with warm water and then pin it on a towel to dry. It still curls a little but is much more wearable than before.


 I think it will be a while though before I attempt anymore knitting projects. I've really grown to value the craft and the intense amount of time (and skill) it takes to knit things.I'm impressed with all you knitters out there!
Lisa x


Tuesday, 13 May 2014

Mini hot air balloon.


While the nursery is finished (except there aren't that many baby clothing items in there and no baby!), the baby is actually going to be sleeping in our room to start off with. I didn't want to set up too much of a baby space as it's living in our room is temporary but I wanted the baby's corner to feel a little bit cute and special. I will get a second hand bassinet from my sister-in-law which was white and perfect. Then I decided on two diy projects- a quilt and a mini hot air balloon. The quilt is coming along beautifully so I can share it soon but for today I'm sharing my little hot air balloon. There is something whimsical about things hanging from the ceiling and our ceiling already had a hook in the perfect spot. 
 
thrifted basket
To begin making the hot air balloon, I thrifted a little basket and got to work paper macheing a balloon. I had initially blown up the balloon larger but as I was adding the newspaper pieces it burst :-( and I resorted to using a slightly less blown up balloon. When the balloon mould was dry, I undid the balloon and cut a hole in the paper mache bottom.

For fabric I choose to use some leftover fabric from my current quilt project. That way both diy items will tie together nicely. I love the choices you get to make when you diy something yourself and how you always end up with things exactly the way you want them to be. The yellow and black floral material was also used on the lamp shade update so it's making it's rounds in the house.
I used a quilter's ruler and rotary knife to cut my fabric into 2 inch squares and attached the squares in the best  patchwork style pattern I could manage (curved edges are hard to work with). To attach the fabric I used some mod podge, leftover from my lamp shade upcycle and diy filing cabinet.

I used some mustard yellow wool from my craft stash to attach the balloon basket to the balloon and attach the hot air balloon to the ceiling. I have a big old craft room filled with stuff so I am really trying very hard to use some of it up and not buy new supplies unless they are absolutely necessary.The handle easily pulled away from the basket and attaching the basket to the wool involved simply tying some knots. I put a little giraffe toy my mother gifted me when I was younger in for a ride and it was all finished. I tested it to make sure the measurements of the wool were correct. This testing stage happened while we were mid painting the room.Once the wool was the right length, it was time to leave it up for good and this shows the start of a little baby area in our bedroom for when bubs first arrives and we want the baby to be sleeping nearby.


As you can see the little baby area now includes a hot air balloon, a diy baby gym and some thrifted frames which hold beautiful giraffe illustrations that I found in an old second hand book belonging to husband. I am considering sewing some bunting for the area too as I've still got a bit of the fabric leftover (as used on the hot air balloon and a quilt I am finishing) and I am one big fan of bunting :) I might also add a few other little friends to have a ride in the balloon
From this post, you can also see a  snap of our how we are progressing doing up the master bedroom. The walls are now coated in a crisp layer of taubmans 'hydro' paint and the room is feeling so much better, bigger and cleaner! I'll share more of the master bedroom update soon.
Lisa x

Friday, 25 April 2014

Ideas file- a homemade fruit bowl and dog feeder.

I am a dreamer and a diy junkie as is obvious by this blog! I am always dreaming up new projects and am thankful to have people in my life to help make these dreams a reality. There are some things I needed and I wanted to create items that would be unique and lasting in our home. Two items on my want list were a nice fruit bowl and a dog feeder for Maisy as her current bowls were cracked and very old. 

1) the perfect fruit bowl. 
I was after a fruit bowl that could hold lots of fruit and would look pretty in the kitchen. I also wanted to have a bowl that had a homemade unique feel.
My Grandpa went through a stage a while ago where he just used to make lots of wooden bowls. After raiding his stash, we found a large wooden bowl and a smaller one to turn into a fruit bowl. I decided to make the fruit bowl double layered as that way I could hold more fruit and fruits that age each other when put together could be separated. Grandpa looked through his random wood pieces and found a piece that we could use to join the bowls together. Then we used wood glue to hold the three pieces together until they had set and stained the wood piece in the middle to match the two wooden bowls. I love this fruit bowl in the kitchen.
* The jam pictured next to the fruit bowl is quandong jam that grandma and I made on Tuesday- it's so delish.

2)a homemade dog feeder.
This was designed with Maisy's habit of pushing around the bowl in mind and also the problem we had with ants always getting in her bowl.  I purchased two white bowls for $3 each from neds. We (Grandpa and I ) used the bowls as measurement and cut two holes out of a piece of wood and then added little legs. The feeder worked out so well that then we had to make one for mum's dog too as she was envious of how nice it had worked out...it's always flattering when someone likes your idea and wants to copy it :-)


Clearly Maisy enjoys eating from her new feeder...and just eating in general really :)
Two items to check off the to buy list and since they used supplies already owned, only $6 to make them- I do love some thirfty home decorating, especially when it ends with unique items I can treasure. Have you been dreaming up any new home ideas lately?
Lisa x


Thursday, 24 April 2014

Small budget changes to the laundry.

I am pleased to show another room reveal today of some pleasing changes to our laundry. The existing laundry was a dirty and unappealing room. I know no matter how pretty my laundry becomes, it will always be just a laundry, but with a baby coming I will be washing a lot more, and it should be a pleasant place to be.With a very small budget to play with it wasn't possible to gut the laundry and get a new trough and cabinets but I tried to make the space more livable for the now. I guess you could call this makeover a stage one makeover as we save for a future makeover that will hopefully include adding an additional toilet to this room. Let's have a look back at what it looked like when we bought it. There were sunflower tiles, dirty flaking walls and a scratched worn blue trough.
Since we had a lot of taubmans sea bubble paint leftover from the bathroom and nursery, I decided to use it in the laundry too. It is such a calming, light, fresh colour that I could see it working well.
We began by removing the sunflower tiles (don't get me wrong, I like sunflowers but these just weren't working for me). Once they were removed it was clear that the wall needed a heck of a lot of patching and cleaning before it was ready to paint. In fact the whole laundry demanded a deep and through clean. Once painted the room was starting to look a lot better.
We then used caulk to fill in the gaps in the laundry bench and cut out a shelf in the underneath cabinet so the laundry had somewhere to store a washing hamper full of dirty clothes.


The blue trough looked terrible with the new walls so it was painted in two coats of enamel white paint and looks like a completely different trough.
The laundry was then ready for a little styling and I added a few thrifted green tins as well as painting my old peg bucket the same white colour as the trough ( it was originally a dark blue).
The ironing board was mounted on the laundry room door using a cheap hanger from mitre 10 and this is great for keeping it out of the way.
We also changed the lighting which greatly affects the feel of the room.  While the existing blue pennant was quite industrial and funky, the blue was really clashing with the newly painted seabubble walls. I bought a lampshade on sale and just love how the new lamp shade casts web like shadows all over the walls.
before
The final task I did was to sew a little curtain for the laundry cupboard so you can no longer see the clutter behind it. To make the curtain I purchased some green fabric (on 30% sale at spotlight). The space between the cupboard was 54cm so I used 80cm of fabric. I've never sewn curtains before but this fabric was easy to line up due to the linear pattern. I used heat and bond lite (cut into thin strips) to hem the sides of the fabric. To use this you simply iron down the heat and bond lite. Then peel off the top and the two fabric sides will stick together once ironed. This made it easy to get the hem straight and then I used the sewing machine to stitch down the hem except for the top. I double measured the length and hemmed the top, leaving a gap big enough to threat through some stretch plastic. I used hooks to hang the fabric and then had a cute little curtain which really completed the neat look of the laundry.
As we used supplies that we already had, I only had to purchase the lampshade, curtain fabric and ironing hook which made this makeover cost less than $80 for the whole update. While the laundry is already a massive improvement there are still a few plans on the horizon.
Future ideas:
-Add some more artwork.
- Look at cabinet options for above the machine/trough
- Possibly buy a dryer (a baby is going to make a lot of extra washing)
-Maybe one day add a toilet to the room so our house has a second toilet.

Washing just got a whole lot more enjoyable :)
Lisa x