Showing posts with label baby. Show all posts

Friday, 3 April 2015

Easter basket ideas for a baby


It's the first time we will celebrate Easter as a family of three. I love getting crafty and creative for each different holiday, made especially fun now that I have a little one to share it with! I wanted to put together a little Easter basket for Henry (even though he's only 9 months old). In creating a basket, it needed to include items that remind of the true reason why we celebrate Easter; Jesus' death and resurrection, as well as being age appropriate for a baby (i.e no chocolate). Although I did include a couple cute rabbits, I really want Easter for Henry to not be about a bunny that gives chocolate, but a loving Saviour who died to set us free.


The basket was thrifted from an op shop years ago and is finally getting some use. I'd always thought I wanted to do Easter baskets with my future kids. When my brother and I were younger we'd just rummage through the kitchen to find old icecream containers for our eggs. As we grew older these icecream containers got decorated and I hope that in the future Henry and I can make Easter baskets together. 

After some thought I decided to include :

- plastic eggs
I filled one with mini chicken and sealed it with tape. The others contain an animal cracker each and will be fun for Henry to practice opening and closing. These plastic eggs can be found at your local discount store.

- a board book about the Easter story
From the Christian book store.

- a little rabbit I made out of fabric scraps

- a handmade rabbit rattle picked up from a local craft market
This one is much cuter than the bunny I made. I always like to support local crafty folk.

- a drawstring bag (with a cross on the front) that contains felt pictures telling the Easter story.  
These felt pictures were found at the Christian book store. I sewed up a drawstring bag from fabric I already owned and appliqued a cross to the front to make the bag a bit more special. Now that the felt pieces have a place to be stored, hopefully they are less likely to get lost. As Henry gets older we can use these felt pieces to retell the story time and time again.


I hope you have a wonderful Easter celebrating that He is Risen. If you have any future ideas for things to include to Easter baskets, I'd love to hear them.
Lisa x

Friday, 27 February 2015

How to organise cards.

I've always been someone who likes everything organised and in its place and I have a box which stores piles of old cards and special notes which I can't bare to part with. However with Henry's birth and the baby shower and dedication, cards were just piling up. I recently read about the idea of not having items that don't spark joy and some people may just throw cards away,  I really treasure them.
I wanted to make sure I kept them in an accessible way so I can refer back to them and keep them together. Too much love and kind words were in these cards to stow them away in the bottom of a box.
After trying several options for organising cards in the past (including gluing cards in notebooks, scrapbooking and using photo albums), I've decided on a favourite way- using hinged rings.
A box of these set me back about $12 from Officeworks but the 30 hinged rings I have should last me through a first, second and third birthdays and then ....30th birthdays.
I used the original invitations as the front covers of the cards and holepunched through them all, before joining the cards using the hinged rings. As we received so many cards when Henry was born that I actually sorted the cards into sizes before hinging them and making three piles. The photo below shows the different books of cards but I haven't shown you the cover invites as they contain personal addresses etc. For Henry's birth cards there was obviously no invitation so I attached a copy of the announcement card we sent out when he was born.


These cards are now stored in a white box on my office shelf- .ready to refer back to if I need a good read and one day Henry and I can read through them together. I will definitely be doing this in the future for when we get cards for other special occasions.
Lisa x
P.s Don't forget to enter the giveaway below, it's still open for a few days :)

Thursday, 22 January 2015

Henry's dedication.

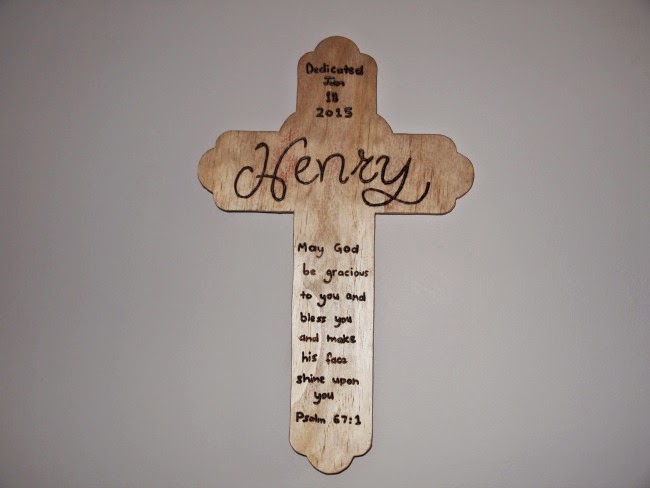
My husband and I are practicing Christians and had a dedication ceremony for our son, Henry, recently. A dedication is a chance to declare our intent to raise our child as a Christian. It was a special day for our family and I wanted to make Henry a little cross to remind him. I used an existing cross that I had and my dad helped to cut out the cross shape once the lettering had been done.

To make a cross (or other shape) similar to this you will need:
a pencil
a cross shape template
a piece of plywood
a soldering iron
a fretsaw (or someone kind to cut it out for you)
sandpaper


Once I had decided what I wanted it to say I wrote it out in pencil. I have average handwriting but it is a special handmade item for Henry from me. Once I was happy with the text I used a soldering iron to write over the pencil and burn the text into the wood. Since the verse I'd chosen was quite long it took a few hours but is a fairly therapeutic peaceful activity to do while baby sleeps.

My dad cut out the shape for me and we added a hook on the back to hang it with.I hope we can use the cross with Henry when he's older to discuss the meaning and reason behind his dedication. I've also included a few other photos of decorations from the day. They're fairly basic decorations as I'm time poor at the moment but added to the special feel of the day.


Lisa x

Monday, 27 October 2014

Put it in a photo book.

Okay so if there's something to know about me, I'm kind of obsessed with organising things and taking photographs. It's no surprise really that I have really gotten into photo books lately as they combine the best of both- ending up with organised photos. I love having photos on view and to be able to look back through special times and with so many cheap and easy websites out there you can make a photobooks for around $5 + postage...what beats cheaply organising photos??

I thought I'd share today a few photo book ideas that I have made recently. They are special to me and I love having these neatly recorded snapshots of early motherhood.

A photo book all about your pregnancy
I initially was skeptical about remembering how I looked during my pregnancy as I got bad fluid retention and swelled up like a balloon but it was such a special time in my life. A photo book allowed me to combine the few photographs I'd taken to make something of a little substance. In retrospect I probably should have taken more photos but I felt like a giant balloon, rather than someone sporting a cute bump. Thankfully once Henry was born, the swelling decreased significantly. I choose a beautiful quote for the back cover and filled the book with bump photos, ultrasounds, snaps from our babymoon, the baby shower and photos of the nursery.
A photo book about your baby's first days in hospital and at home
Another photo book I was very keen to make was inspired by pinterest and was a book documenting Henry's time in hospital and first few visitors when we got home. It was a wonderful way to record all the love around him when he was born and also a place to record some special messages we received that otherwise may have just got lost in the sea of messages kept on my phone. I look forward to when Henry is a bit older and we can read through this book together and look at the pictures.


 A photo book of professional photographs
We also got some professional photographs taken at the hospital when Henry was born and these have been wonderful for photo books as I've made photo books for Grandpa for Father's Day and also Grandma's birthday using these images. He was only 2 days old at the time so it's wonderful to remember what he looked like all teeny tiny and new. I also made a little book for myself with all the pictures altogether (one of the pages is pictured at the start of this post).

This self confessed journaling addict also admits to owning a few baby books and I thought I'd share the two I choose for any readers out there seeking looking for present ideas or journals for yourself.

This was a gift from Mum and has been so useful for recording and storing special early photographs and information that would easily be forgotten. Pages include topics like 'my first visitors', 'what my parents remember about my first weeks' and special memories of each months.
2
The journal loving side of me got a tiny bit giddy with this cute little journal. It is such a nice way to record each day and is broken up into sections about feeding, sleeping and changing as well as an area to record the baby's mood. If you miss a day it is fine as you just enter each date that you enter information (not that I've actually missed a day since I bought the journal ) and there is also a section at the back for monthly highlights. 

Between these two books I think I've got things recorded well. I look forward to when Henry is bigger and we can go through his baby books together- I know I loved looking back at my baby book when I was little and also in the lead up to Henry's birth wondering what my little munchkin was going to be like! The journal is really just for me but the days blurr together and it's a nice way to remember the little joys of motherhood (and challenges) and maybe compare those early days if a future bub comes along.

For now who knows how many more photo books I'll end up making- watch out Grandparents and Great Grandparents at Christmas time!
Lisa x

Wednesday, 22 October 2014

Homemade baby mobile.

I headed out to a crafternoon on the weekend which gave me that time I'd been craving to get a few little projects started- a few hours of just plain Lisa time.I had some sewn mice and wanted to turn them into a cute mobile for Henry as he just loves lying on his back and staring up. I thought this mobile would be the perfect colours for the playroom and add an extra playful touch.
You will need:
Embroidery hoops- 2 different sizes (I used some hoops made for tri chem paints that I picked up for free at a garage sale a while back), wool (I chose to use red and navy but if you wanted your mobile could just be one colour), scissors, a needle and some little animals (or other objects) for your mobile.

This DIY project is really so easy that any level of crafting skill could make this.Begin by wrapping the wool tightly around the hoop without leaving any gaps. Repeat this with the second hoop.
The next part is a tiny bit trickier as the perfectionist in me had to redo this part about five times before I was happy. I began by measuring and cutting three equal lengths of red wool and attaching them (spaced roughly evenly apart) to the red hoop and blue hoop using simple knots.I then cut three lengths of the red wool and spaced them evenly around the blue hoop. To help me with making sure every section was equal I hung the mobile from the baby gym and adjusted the lengths until I was satisfied with how flat the hoops were sitting.
I sewed my mice onto lengths of blue wool and then hung them around the hoops with a mice on a ball in the centre. I choose to vary the lengths of the wool holding the mice slightly and when I was happy with the length, I tied a knot. To ensure the knots don't come undone and fall on Henry as he stares up, I used a little bit of glue from the glue gun to make sure the knots weren't coming undone anytime soon. I put a hook in the ceiling and added extra wool to attach the mobile to the hook.
Henry seriously loves looking up at his mobile and looks up and laughs each time I knock the mice to make them move. I'm a pretty big fan of this cheap and easy mobile.
Lisa x


Thursday, 18 September 2014

and almost two months later...

Life looks so different now compared to three months ago- I've spent many hours cuddling, kissing, rocking and feeding the little baby attached to those adorable feet. I've let my little corner of the web go for a short time but now I am finally settling into a bit of a routine and getting chances to do a few new projects while Henry naps. As soon as Spring started (here in Australia) and I felt I little bit of warmth, I wanted to clear the excess stuff that had been building up in our home and reassess the way we've set out our house now that I am a stay at home mum for the time being. There is just something soothing about waking up in a clean organised house and not having any junk or useless objects around cluttering up space- the more excess stuff the more cleaning needed.
After searching the web for ideas to motivate me to declutter, I stumbled across the 40 bags in 40 days. While this challenge was a few months back, I've taken it on myself and so far I'm 7 bags and 7 days in. I've also been purposely seeking charities and donation places to take these goods and doing a bit of tossing as well. Our home already feels much cleaner and organised.
Although my last post was about setting up the guest room, we had my sister in law and her bub stay for just under two weeks and after that I realised the space would be better used as a play space (joining on with the lounge room). I then moved the guest room to another room- combining it with my craft/office room which is really just a space to hold everything I have quite worked out what to do with. Let's be honest, kid's spaces are super fun and since we spend lots of time reading (already, I know, I'm a teacher), listening to music, lying under the play gym, practising tummy time and sitting in the swing- I like having a dedicated space to keep all these things organised and house the toys that Henry will grow into in the future. Being a Junior Primary teacher for the last four years has meant I have many toys that Henry won't be using for years.
I've attempted a mood board below of a few things I'd like to incorporate into the space that can remain as constants while the toys evolve.

 1 / 2 / 3  / 4 / 5 / 6 / 7
For storage an expedit (know known as kallax in Ikea) is great as it allows toys to be on show and accessible or grouped together in boxes. I already have one I purchased second hand last year which is perfect. After looking around I've become a bit smitten with the Skip Hop range of storage boxes as they're just so cute and a bit more fun that a plain box. It's always good to have some soft surfaces to play on and a sheepskin rug is perfect for that as well as Skip Hop play spots. I recently got a free faux sheepskin rug from a deceased estate and my sister in law gave their old set of play spots which are perfect for the space. The walls need a bit of excitement as I'm leaving them white. I love these star decals from walls need love and a search of Etsy led me to these cute artworks. I'm also hoping to do some DIY projects in the room.
Here's a little sneak peek of how it's coming together...
Time to go fill another bag for today- 8 days down :-)
Lisa x


Wednesday, 18 June 2014

Applique baby boy onesies.

When we found out we were having a boy I immediately started thinking of baby boy outfit ideas. For my baby shower I was gifted with quite a few plain onesies so I thought it would be good fun to make a few of them a little more special.This process is so easy that really anyone could make a whole collection of applique onesies in not much time and for minimal cost.
I began by hand drawing templates for a tie and bowtie. As these are fairly simple shapes, it was quite easy to freedraw the shapes. If you don't feel as confident there are many printable outlines online.
template
Then I cut some spare material to size and used heat and bond lite to permanently attach the material to the onesies with an iron. This way the material stays in shape and is easy to sew around.
For a finishing touch I used white thread to blanket stitch around the material. If you are unsure how to blanket stitch, here is a good tutorial to use. My blanket stitch isn't perfect but it's quite neat and I'm pleased with my end products. The more I make, the better my stitch will get :)

The little gingham hat, hook and coat hanger were all thrifted. I found an amazing number of cute plastic hangers in a thrift shop in the ACT and have been able to use different shades of yellow and white to sort the clothes by size, ie all 000 go on bright yellow hangers.
These would also make cute gifts and presents for other little baby boys in your life. After all what little man doesn't look dashing in a tie?
Lisa x

Monday, 16 June 2014

A pennant quilt.

After I finished my first quilt, I think I caught the sewing bug. Another quilt idea that interested me was making a pennant quilt so I thought I'd give it a go. I choose to use a range of yellow fabrics (left over from my first quilt) and buy a few small pieces of black fabrics.

Each of the triangles are 5 inch triangles and I used a rotary knife and ruler to measure them all accurately. In total I cut 24 triangles.
The plain yellow, yellow gingham and floral triangle fabric was thrifted while I did buy the rest of the fabric. I'd love to thrift more fabric but nice fabric in thrift shops is hard to come across.
Once I had pinned a rough layout,  I used some heat and bond lite to make sure the triangle stayed in place while I sewed them down.
 Heat and bond lite is a fantastic product that makes the fabric stiff and stick in space. It is a little expensive so I tried hard to not use extra than needed. Firstly lay out the triangles on the heat and bond lite and then iron it down. Don't iron directly on the heat and bond lite as it will stick to the iron.
 Then arrange the pieces in place once again before peeling off the heat and bond lite backing and ironing down the fabric in place.
 Now the triangles are in place and ready to be sewn down. This next part caused me a whole lot of trouble as my sewing machine is very old and doesn't have a zig zag stitch. I tried going to a few friends places to sew the pieces down with zig zag stitch but it was quite time consuming and in the end I borrowed a friend's machine to take home and finish off the zig zag stitches. While they are not perfect, the quilt definitely had a charming homemade feel to it at this stage.

Once the zig zag stitch was completed,  added some black gingham print fabric around the edge of the quilt, using my handy ruler and a rotary knife to cut the gingham fabric to size.

I then sandwiched the quilt together with the front, inner quilting wool and the backing.I choose a floral black, white and yellow print for the quilt backing ( also used on updating my thrifted lamp). When all three layers were sandwiched together and pinned in place I put on the quilting foot and sewed three lines across each row of bunting. I also used the quilting foot to sew around the ditch (edging between the white fabric and black gingham fabric.
I purchased some plain black discount fabric and cut it into 21/2 inch strips for the edging. I sewed the fabric together to create a long piece of 2 1/2 fabric and ironed it in half using my iron.
I then pinned the bias binding in place on the backside of the quilt. Once pinned in place, I sewed it onto the fabric. Then I folded the bias over the front edge and pinned it in place. I then machine sewed the bias onto the front of the quilt. This was a little different to my first quilt as I hand sewed the bias binding onto the back, while this quilt used a machine to sew all the bias.


I just love the end product. It it so beautiful and the perfect colours. I think the colour choice means a little boy or girl can use it and it's a nice size so should last the bubs a few years and hopefully be a bit of a special quilt for the baby and good for tummy time.

One more project crossed off the list and finished :)
Lisa x

Saturday, 31 May 2014

Baby shower ideas.


A few weeks ago one of my darling friends decided to throw me a baby shower and it was just fabulous. I loved seeing everyone and felt spoilt rotten. I thought I'd share some photos from the day and some cute ideas she had incase you're throwing a baby shower in the future and want some inspiration.

She had some great signs custom made (which can also be reused again if she cuts off the top/bottom of each). She also had a few prizes custom made for when people won different games. It's the little things that made it so special.
To make the girl guides hall where it was held feel a little more special she used fresh flowers, nice glassware and put candles in jars everywhere...and added some yellow twine as who doesn't love yellow!

We played lots of games but I only have photos of one. We played  a version called pin the dummy on the baby and the dummy never quite made it into the baby's mouth but in lots of other unusual places. My Grandmother's dummy even made it to the next pinboard across :-) 

There was a stack of diapers for people to write messages on. I haven't read them yet as I'll wait and enjoy them as I make many a diaper change and need a laugh or pick me up.
Apart from a whole lot of other yummy food, she had also made some baby cupcakes to decorate. There was a collection of different coloured icing and many bits and pieces to layer on top.

These are just a few of the ideas that I hope might inspire any readers out there planning one. Although these little details made the day so special, I was just grateful to be surrounded by family and friends and to have this little bub growing inside me.

 Thank you Leah for an amazing party!

Lisa x