Showing posts with label paint. Show all posts

Friday, 30 January 2015

The guest room/office project : the desk area

My latest project is the guest room/office and I thought I'd share with you the creation of my 'new' desk. The desk was a little freebie find which was just the right size for the space I had available in the room. Complete with three drawers, it was in reasonable condition and just needed a  few coats of paint.
The before photos show it after a little bit of mending and sanding had taken place- I'm always to eager to get into these craft projects and forget to take before photos.
I'd found some pretty little gold flower handles on a garage sale for $1 each and they looked quite cute on the finished drawers. I just have a thing for pretty little handles and these were so delicate and smart looking. Once the desk had received the usual treatment- repair, sand, prime and 2 coats of oil based paint (seemed to wear better), the handles were attached and the desk was put inside.
While there were three drawers to fill, it wasn't quite enough so I decided to add some shelving. For the shelving my Dad actually cut some melamine he had a home to size and ironed on white edging. For the brackets we used Ikea EKBY brackets (currently sold for $4 each). These don't come in gold so with some gold spray paint they were transformed (and also a chalkboard frame I already owned). I just love the pop of gold- it just feels like a very classy and nice place for me to work now. I have plenty of spray paint left over now so I'm dreaming up other things I can give a gold makeover.


The top shelf houses beautiful brass giraffes I received as a baby, a favourite Roald Dahl quote and  some storage boxes.
 The middle shelf is home to lots of paperwork including my 2014 memory box and also a little elephant from India.
The bottom shelf is home to some special photographs, prints of Henry's darling little newborn feet and a frame from a previous project that I updated using gold spray paint. There is also a little brass piano from my childhood doll's house...can you sense my eagerness to find any gold items I could in the house and give them a new home? You know you are running short on brass items when you have to raid your childhood dolls house... though every room does need a little quirk in it.

Then on the wall is another old project that was updated to suit the new style of this room. The frame was given a coat of gold spray paint and I just love the end result. It really changed the whole look of the frame.


And there you have it, my new little office nook. While the desk is now in full use (I'm sitting at it right now writing this post), I'm still looking to finish off the workspace a bit more by adding more pieces of paper to my pinboard and working out how best to use the desk space. I am also working at finishing off the rest of the room and look forward to sharing other progress around the room soon.
Lisa x

Friday, 9 January 2015

Master bedroom makeover.

The master bedroom was one room that needed to be fixed up before Henry was born as he sleeps in a cradle in our bedroom and also has a feeding chair in our room.
Our master bedroom is a great size with a connecting walk through wardrobe which leads to a bathroom. For now the walk through wardrobe is staying the same but there's a door to close off and then I wanted to have a tranquil, neat and clean master bedroom. I decided to get a bit more adventurous than my usual love of white walls and below shows the pale green walls were started with.

This before photo is what the room looked like with the old owners furniture. While the room looks in okay condition there were actually cracks everywhere and the curtains were threadbare see through curtains that hadn't even been hemmed and just trapped dust. It did not in anyway feel like a master bedroom although it had a nice sized walk through robe and is actually quite a large room.
Here are some before snaps with our furniture in it which also shows the condition of the bedroom walls.

We decided to work with a few existing items we already had. Husband and I had purchased a four part bedroom suite when we were living in the country that is quite special to us so we wanted to keep our existing bed side tables, tallboy and four poster bed. The bed has a special carving in it that my Grandpa did using an image from our wedding invitations. With these furniture restrictions in place we really wanted to create a calm, peaceful and beautiful bedroom. One dresser wasn't quite enough for my large clothes collection so we also placed my recently upcycled white dresser in the room.

Although the bedroom is still not finished - especially as we are currently sharing it  with the baby, we've made some significant progress.
The first thing we tackled was the long rectangular window on the back wall. When we moved in our old ikea curtains were not a fit and the constant stream of light in our bedroom was not welcome. As the window is an odd shape we ordered a custom blind during a recent blind store sale- 30% off. The blind fills perfectly and really blocks out the light. Because of the length of the window and position of our bed in relation to the window, we are not going to have curtains.There is a second window in our bedroom which still has the old original wooden blind (pictured in the before photo) but we don't quite have the funds to replace it. The reason the bed is not centered in the window is because we needed room for Henry's cradle and also due to the placement of our walk in wardrobe and fact we have a 4 poster bed, it was the necessary position to allow us to watch our television in bed.

Then it was time to paint and this time 'antique white' (my usual choice) was just a little too safe. After buying several test posts, we settled for 'hydro' by taubmans.  It's a turquoise, grey colour. That's right, we went colourful! I think most of my previous paint choices have been fairly safe, thinking about future resale and timeless colours but since this a house we really want to make our own, it was time to get adventurous. The walls needed a fair bit of patching but thankful my dad is a patching machine. We removed all existing hooks to get a clean, fresh space but the best change was going from green crown molding and a creamy ceiling to a fresh dulux 'lime white' ceiling. It's amazing how much a white ceiling cleans up a room.

Our old furniture was then put back in place along with items we use often (like my jewellery collection). We also put up the mini hot air balloon and moved in the bassinet we got from my sister in law as well as the rocking chair that orginally was going to be in the nursery.
I also splurged and purchased some new lamps for the room. They suit the room well and I'm loving their pattern. The bases are white and simple so if we ever want to change it up again, we can simply replace the shades. The pattern also ties in with the bedcover that goes on top of my rocking chair (wooden rocking chairs are far too uncomfortable to sit in for hours of nursing and my newborn liked to feed for hours on end).


Henry has a distinctive area in the room and once he moves into his nursery, we'll work out a new use of the space. For now the room is very practical and peaceful to be in.
The lamps and rocking chair were purchased from gumtree, the pillow is from bed,bath and beyond and the bedcover on the rocking chair is from kmart. The canvas prints of Henry were made via canvas factory and the bunting was homemade.

I do have a few future ideas, the main one being to either DIY the fan or replace with something a little more interesting and modern- although it will still need to be a fan as the Australian climate begs in fans in bedrooms. For now it is a big improvement and once the baby starts sleeping through the night (please, please be soon), I'll be on my way to getting a great nights sleep.
Lisa x


Wednesday, 23 July 2014

And onto the guest room for a new paint job.


Once you start painting, it's hard to stop as new paint just makes everything look so much better. We've only got a few spaces in our home now that are still wearing their old crusty paint job, the rest of the house is fresh and ready to have personality added to it. With paint cans filling the hallway and rollers everywhere, we proceeded to tackle the guest room . This room is in the front of the house and was originally a second dining room but my clever Dad enclosed it with some old blackwood doors he owned. Living back in the city I am unsure how much use the guest room will get (it's only had four sets of visitors through in the last 6 months) but since we've got the space and already owned a spare bed, it seems like just as good a use for the room. In fact husband and I spent 2 weeks in the guest room bed while we were painting our main bedroom. We ended up finishing painting the guest room about a week before Henry came along.

Recently I found out my sister in law and niece are coming to visit from overseas for 10 days so it seemed like the time to get the guest room together before they arrive. It's exciting to add special touches to a room and make it feel that little bit more homely and welcomming.

A before shot: The room was the same dark pink as the rest of the front of the house but with some cracking and necessary filling needed. The before shot was taken with the old owners belongings before we added the blackwood doors.

Even with the doors the room still fells large enough to be another bedroom and the house doesn't feel any smaller than it did previously. We removed the curtains quickly as they really weren't our taste and then had a blank (albeit pink) canvas to plan a guest room in.

If you look closely in the right corner of the picture you can see how the crown molding has fallen down a little. This meant that we needed to remove the crown molding and put it back nice and straight.
The process of replacing it involved using the original pieces and simply reattaching them in a straight line, using screws and nails to hold them in place until the gyprock had dried. Once it was dry the screws and nails could then be removed. Hopefully  in the future we can use some watercolour paints in the future to fix up the marbling and get rid of the white lines left. For now though it is much better that the crown molding is straight and neat.

After this work the room received a few coats of antique white (following the usual painting process) before furniture was moved back in and a few pictures and items we had around the house were given a new home. When decorating the guest room, I used items that needed a home (and I didn't want to part with) and placed them in the room. It is really nice to have a nice, neat, clean room, always ready for use when someone pops round.
The dolls house was built by my grandfather when I was a child, the chest of drawers used to be my nannas when she was a little girl, the bed was secondhand and my Dad built the bedside cabinets (he's so clever). The blanket holder was an upcycled freebie, the Marilyn Manroe picture was purchased in on a holiday in Vietnam and the rest of the items in the room have been thrifted. As my niece is also coming to stay there is a temporary portacot and a few items for her around the room.

I plan to do a feature wall in the room as I loved having the chevron wall in our previous house and would really like to have a special interesting wall in this home. I won't be doing a chevron wall but it will be much more interesting than a plain white wall :)  I also want to keep adding to this room, maybe even some more bunting, to make it more cute and special but it is a far cry from what we started out with.
With a needy newborn I just need to rest for a little before this project will happen but it's always nice to dream of future ideas.
Lisa x

Wednesday, 25 June 2014

Pinspiration making part 4- bathroom mirrors.

I'd been looking through pinterest for a while trying to work out how I could make my builder's grade mirrors just a tad more special in the bathroom. They are both huge mirrors and I didn't want to remove them as I actually enjoy having so much mirror. The extent of mirrors in the room really opens up the space and makes the room feel more light filled. I came across the idea of framing builder's grade mirrors and from there on I was set. 
My Dad has far too much wood in his shed so using some pieces of pine that he had my Grandpa constructed some frames for the mirrors. Once constructed these frames then needed a coat of primer and two coats of enamel white paint before they were ready to put up.

The only way to really show both bathroom mirrors before was to get a very pregnant me in the photo. In this photo you can see the whole bathroom except for the area to the side which is home to double shower heads.
mirror 1
 before
In the corner of mirror 1, closest to the window, was a piece of cracked glass which we wanted to cover. The edging of the mirror was in pretty bad shape too. We used the width of the crack in the glass to determine the width of the frame. For this mirror we used a regular frame with no shelving or other features.

mirror 2
before
This mirror is one that gets used a lot as it is where husband and I get ready every morning so we wanted to have just a little bit more storage. We're both fairly minimalistic with the toiletries we use regularly so we wanted just little shelves on each side to hold those most used items and then all our other sometimes toiletries can be kept in the vanity. 
The shelves were put on either side of the double sink so they are clearly one for me and one for husband. We used the existing shelf to help hold up the new shelves and frame.


I'm loving the difference in the above pictures between the before and after snaps.
I only have one more diy project in mind for the bathroom before I'll consider phase 1 of the bathroom makeover finished so hopefully that will happen soon. So far the only completely finished rooms in the house are the toilet and the nursery.
For photos/tips of how we got the bathroom to the stage it is now see this post on wallpaper removal and bathroom painting.
Lisa x


Monday, 2 June 2014

The painting process-library.


When you enter our home, the first thing you see is the 'library' (it has all our books in it but really is just an room with a few books in) and I was pretty over staring at some pink walls so finally we got round to painting them and sparkling up the room. This room is a great size and needed some wall love to showcase it's potential. Warning...this post is fairly photo heavy as I wanted to make sure I was documenting each of the steps.
before
It was pretty easy decision to use Dulux 'Antique White' as it's my favourite shade of white and I just knew white was going to brighten up the space. This room is quite huge so white was going to make it feel even bigger and grander.
ah, a lovely white wall!
The first wall was painted white about a month ago (we were feeling inspired one day) but the rest of the room cried out for a paint job. Since we have been painting so many rooms lately, I thought I'd share a bit about the painting process for any people out there who haven't done a lot of painting before.

Step 1: prep
As you can see in the before photo, we had already started the prep which means filling in the holes and removing unwanted hooks etc. Some holes may need to be filled, sanded back and refilled again before they are great. I am not an expert at prep but I feel confident enough filling most holes and cracks (though bigger ones would call for an expert). If you have a new house though (or one with walls in better condition than ours) you may be able to skip the prep step and go straight to the primer coat. The photo shows quite a big crack that needed filling.


Step 2: Undercoat and paint the ceiling
We always paint the ceiling first and have used Dulux 'pure white'  for all the ceilings in our house. It is truly amazing how much better the room feels just with a freshly painted ceiling. We do the edges first with a brush (this requires some patience) before rolling the middle section. We usually do an undercoat followed by 2 top coats. However because the roof was so dark we needed to do 3 top coats but this is not the norm.The library has crown molding with a marbled edging. I'm not the biggest fan of the marbled edging but my parents have convinced us to live with it for a while as apparently marbled painted is expensive and fancy and they think I might regret painting over it. I'm really not sure. Because of the marbling we decided to use some dulux 'silver dollar' paint around the edges so the difference between the marble and the white wouldn't be so starch. This took a bit of extra time and patience but I think it is more successful that just white and marbled. Silver dollar was the colour we also used in our front entrance way and hallway beside the kitchen so it's a colour that has been repeated through the house.

 Painting the corners of the roof and cutting around the light and air conditioning vent.
 After the ceiling had been rolled
 
Painting the 'silver dollar' trim ( you can see the big difference between the grey and original pink trim)

Step 3: undercoat and paint the walls.
The walls require the same process as above; do the corners and edges first and then roll in between.

Step 4: let the fun begin- styling!
*disclaimer- I have not finished styling this room at all, lots of the furniture in it is from the guest room (the room that we are currently painting.
The library is a big room oozing with potential but we're not able to buy any new furniture at the moment and have more important things to spend money on in the immediate future. However we could still use a whole bunch of previous DIY projects in the room. The library is home to our upholstered window seat, painted bookshelf and reupholstered baroque style chair. This room is the only room in the house to have gotten new wooden flooring- every other room is still embracing the green carpet of the previous owners. Having a new floor really makes this room feel even more finished from the start.


The lighting in the room is quite tricky to work with so while the before and after looks relatively similar (in terms of paint colour) the wall was originally much darker (like the photos taken while painting). This room is expansive and fairly empty and I believe the styling will evolve as we collect more treasures and work out the exact purpose of this room and the mirror currently sitting on the window seat will find a new home shortly in the guest room.
For the future I'd love to:
-find an amazing comfortable vintage couch for the room
-create built in bookshelves around the window and more storage
- change the lighting
- find some more artwork
Hopefully anyone who comes across this might find this guide to the painting process useful. With this room painted now, we only have two more rooms to paint (craft room and guest room) and some outside painting. I'm not sure it'll all get finished before the baby comes but we've made a pretty good effort!
Lisa x


Wednesday, 30 April 2014

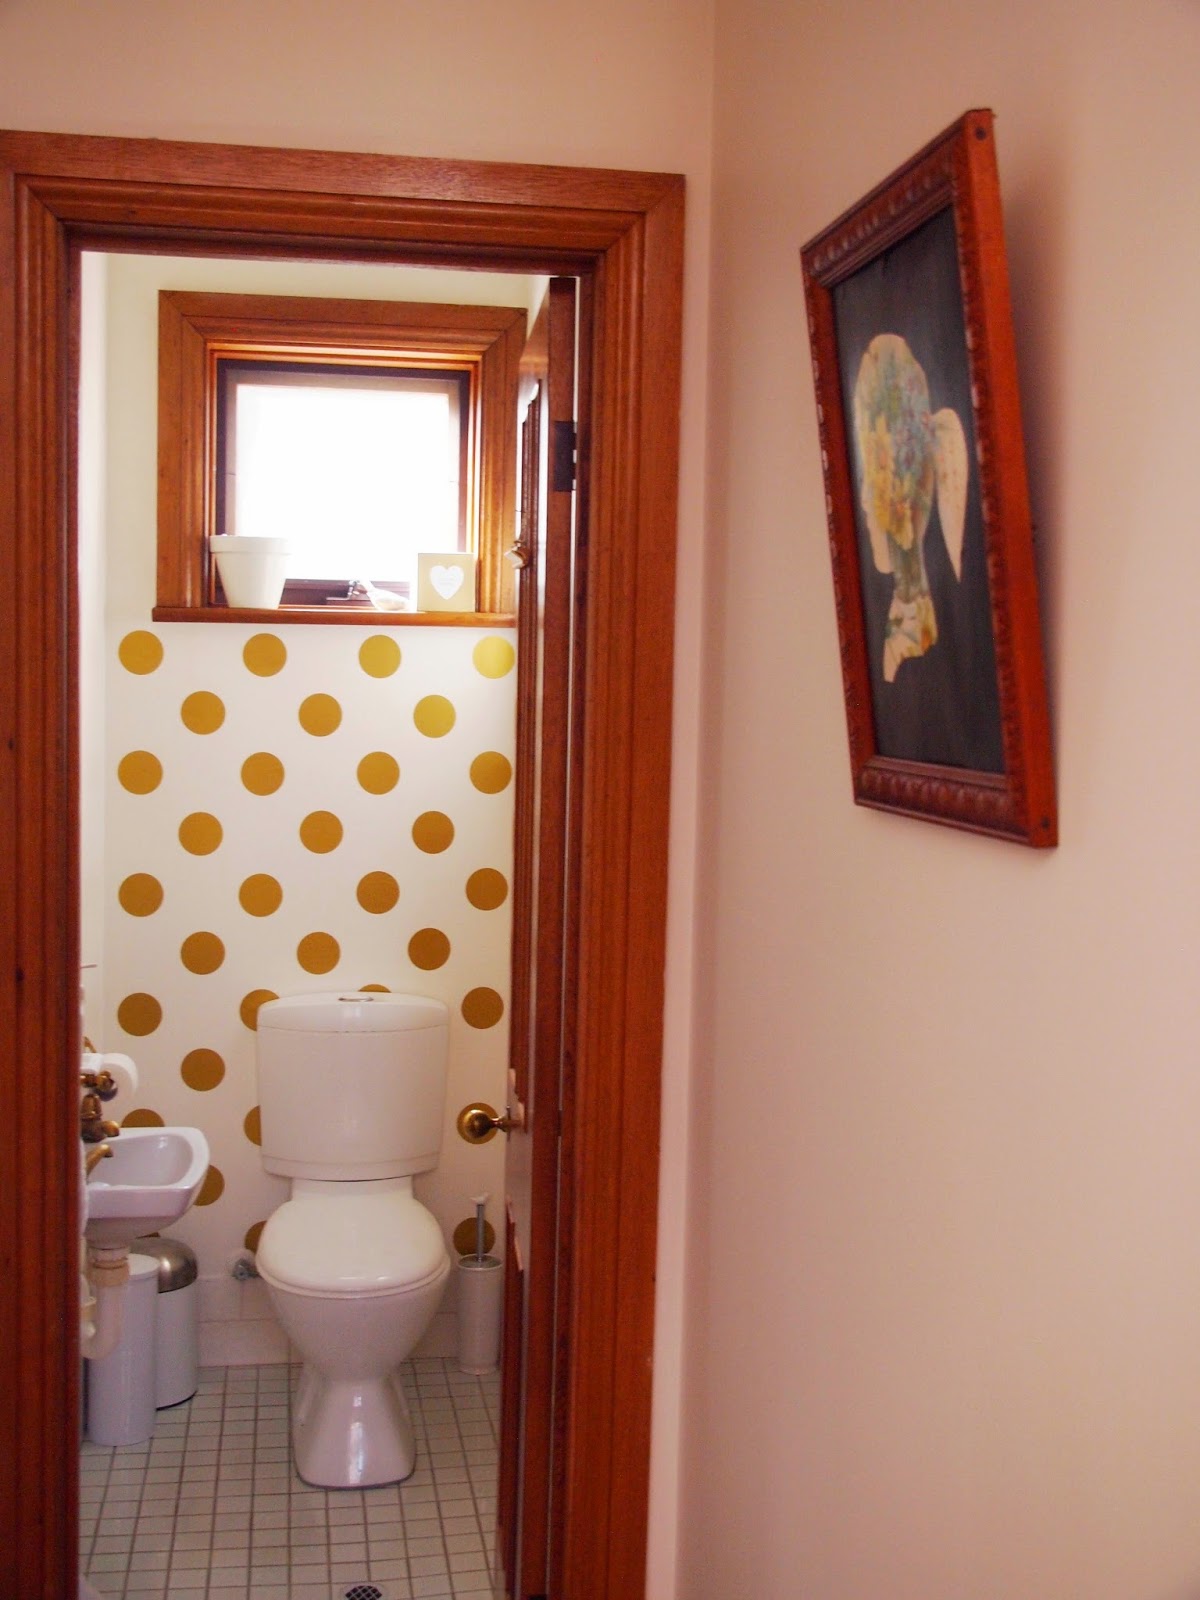
Put some gold spots on it.


Today I'm sharing a finished room- yay- the first fully finished room on this blog but ha, it is the toilet. It feels a little funny writing a whole post about fixing up the toilet room but this little space actually turned out quite interesting and is greatly improved. The house came with a beauty of a toilet area...lace curtains, wooden mirror and some pretty frieze:-)  The moment I moved in the towel rack was taken down, the frieze pulled off and the curtain removed. The mirror was given a fresh coat of white paint and has found a spot in the nursery. However once the walls were empty, we realised what an awful state they were in- patched, peeling and dirty walls that needed some love.
With some paint it was starting to look a whole lot better.  We purchased a little soap shelf , a thrifted gold mirror and a white bin, brush and toilet roll holder as well as a few thrifted decorative items. The door also has a scrabble toilet sign- for DIY instructions click here. We decided against having a curtain as they just collect dust and there is no way for people to see in through the window which is high and blocked by the fence.

But white was just a little bit plain. Since this home is our hopefully long term home, I wanted to make this small space a bit more interesting and special. I order some gold wall decal stickers from 'Walls need love' and they were the extra little touch needed. I used blue tac to work out how to place the stickers and left it for a few days to see if I warmed to the dots. When husband first saw it he laughed and said it looked like a kindy kid had done it but I decided it was probably just the bluetac look...well I hoped that was the case.
Now attaching these dots (which are really just large stickers) was fairly easy but involved a fair bit of measuring.  It was really important that the dots were even before we peeled them off and stuck them down as although they are removable, the more they are fiddled with, the less good they look.We used a small ruler to make sure the space between the dots were even and thankfully circles are a bit more forgiving than squares and lines probably are. A special way that saved us some measuring was using masking tape to ensure the dots all lined up properly and this technique was possible  on every second row. 
In total this small wall took dad and I about an hour to lay, though the hardest part was probably getting into the smaller spaces with my increasingly large baby belly. If you look closely at some of the dots they are slightly crinkled and showed up imperfections in the wall. However when all the dots were laid down, you really don't notice the imperfections.
It's funny that this space is the most out there in our house so far but I'm feeling more adventurous now I have an unusual room. I love having a house which I don't think I'll be moving from anytime soon and can just personalise and have fun with. And if one day if I change my mind, the dots should be pretty easy to  remove.
Lisa x
* I made the artwork in the hallway, for a diy how to link click here.