Showing posts with label bathroom. Show all posts

Wednesday, 25 June 2014

Pinspiration making part 4- bathroom mirrors.

I'd been looking through pinterest for a while trying to work out how I could make my builder's grade mirrors just a tad more special in the bathroom. They are both huge mirrors and I didn't want to remove them as I actually enjoy having so much mirror. The extent of mirrors in the room really opens up the space and makes the room feel more light filled. I came across the idea of framing builder's grade mirrors and from there on I was set. 
My Dad has far too much wood in his shed so using some pieces of pine that he had my Grandpa constructed some frames for the mirrors. Once constructed these frames then needed a coat of primer and two coats of enamel white paint before they were ready to put up.

The only way to really show both bathroom mirrors before was to get a very pregnant me in the photo. In this photo you can see the whole bathroom except for the area to the side which is home to double shower heads.
mirror 1
 before
In the corner of mirror 1, closest to the window, was a piece of cracked glass which we wanted to cover. The edging of the mirror was in pretty bad shape too. We used the width of the crack in the glass to determine the width of the frame. For this mirror we used a regular frame with no shelving or other features.

mirror 2
before
This mirror is one that gets used a lot as it is where husband and I get ready every morning so we wanted to have just a little bit more storage. We're both fairly minimalistic with the toiletries we use regularly so we wanted just little shelves on each side to hold those most used items and then all our other sometimes toiletries can be kept in the vanity. 
The shelves were put on either side of the double sink so they are clearly one for me and one for husband. We used the existing shelf to help hold up the new shelves and frame.


I'm loving the difference in the above pictures between the before and after snaps.
I only have one more diy project in mind for the bathroom before I'll consider phase 1 of the bathroom makeover finished so hopefully that will happen soon. So far the only completely finished rooms in the house are the toilet and the nursery.
For photos/tips of how we got the bathroom to the stage it is now see this post on wallpaper removal and bathroom painting.
Lisa x


Wednesday, 30 April 2014

Put some gold spots on it.


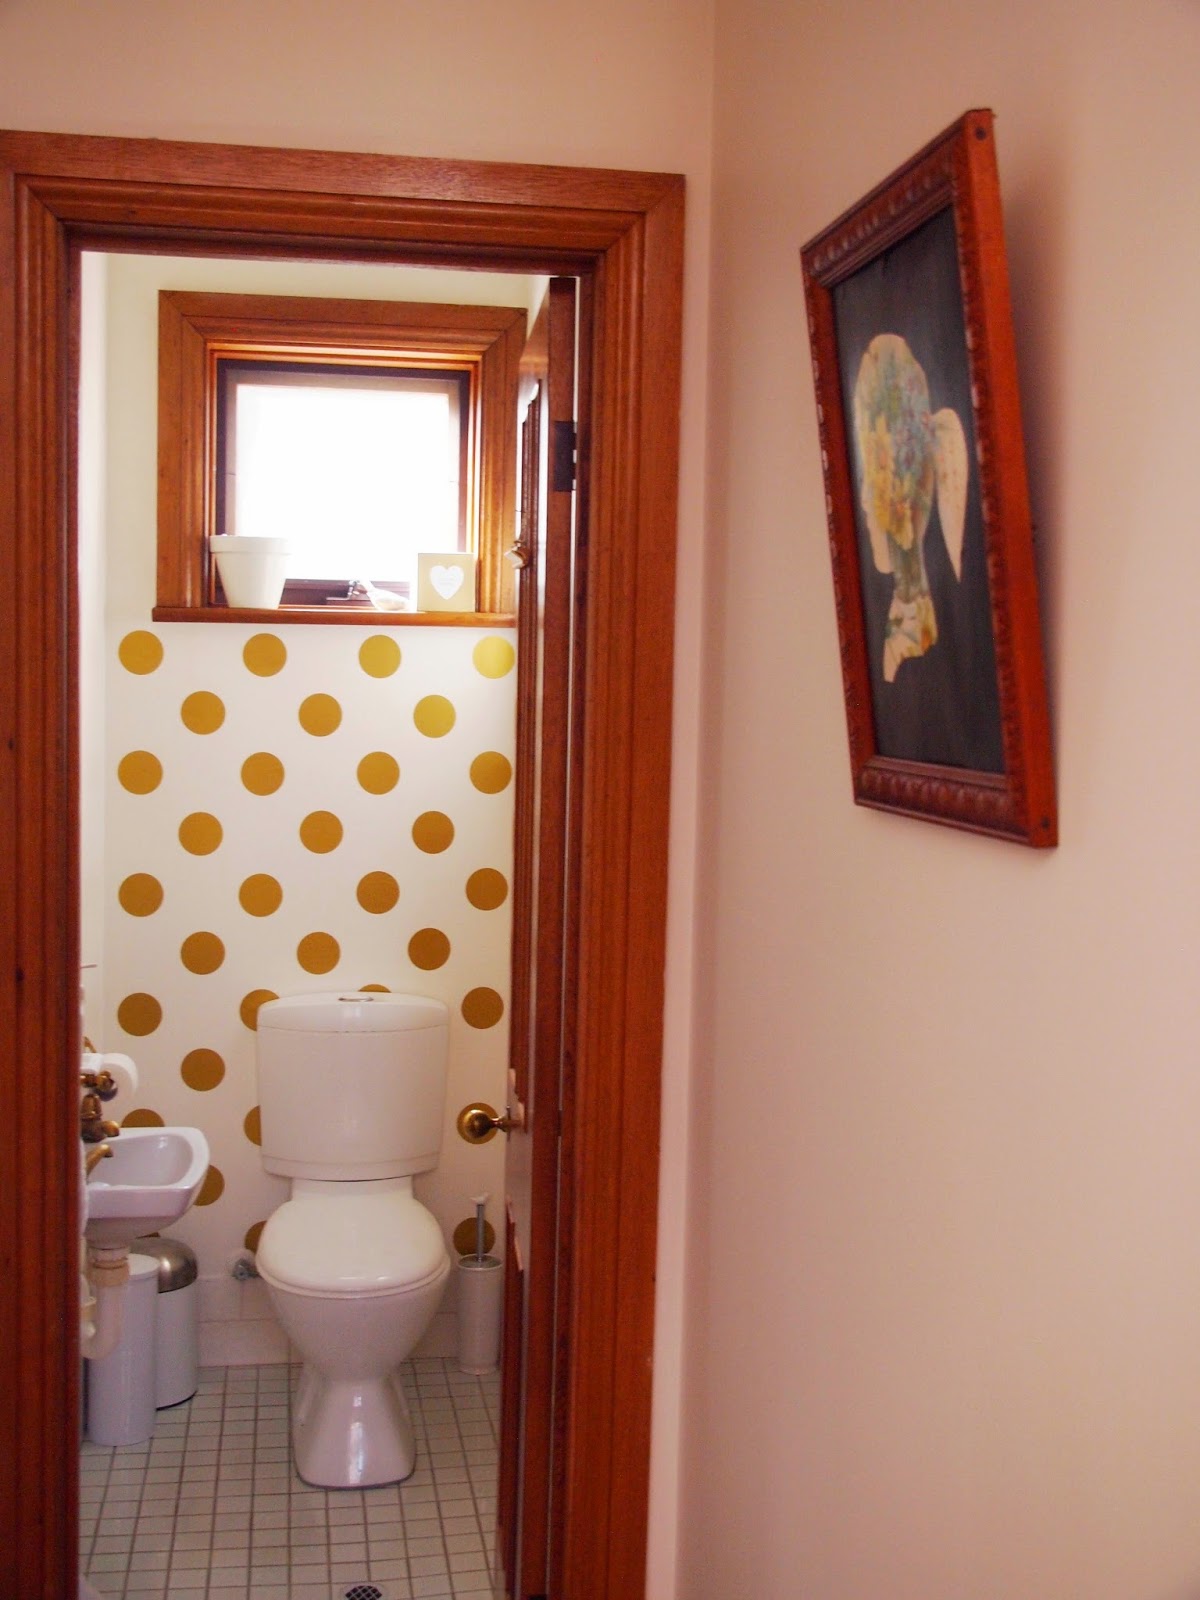
Today I'm sharing a finished room- yay- the first fully finished room on this blog but ha, it is the toilet. It feels a little funny writing a whole post about fixing up the toilet room but this little space actually turned out quite interesting and is greatly improved. The house came with a beauty of a toilet area...lace curtains, wooden mirror and some pretty frieze:-)  The moment I moved in the towel rack was taken down, the frieze pulled off and the curtain removed. The mirror was given a fresh coat of white paint and has found a spot in the nursery. However once the walls were empty, we realised what an awful state they were in- patched, peeling and dirty walls that needed some love.
With some paint it was starting to look a whole lot better.  We purchased a little soap shelf , a thrifted gold mirror and a white bin, brush and toilet roll holder as well as a few thrifted decorative items. The door also has a scrabble toilet sign- for DIY instructions click here. We decided against having a curtain as they just collect dust and there is no way for people to see in through the window which is high and blocked by the fence.

But white was just a little bit plain. Since this home is our hopefully long term home, I wanted to make this small space a bit more interesting and special. I order some gold wall decal stickers from 'Walls need love' and they were the extra little touch needed. I used blue tac to work out how to place the stickers and left it for a few days to see if I warmed to the dots. When husband first saw it he laughed and said it looked like a kindy kid had done it but I decided it was probably just the bluetac look...well I hoped that was the case.
Now attaching these dots (which are really just large stickers) was fairly easy but involved a fair bit of measuring.  It was really important that the dots were even before we peeled them off and stuck them down as although they are removable, the more they are fiddled with, the less good they look.We used a small ruler to make sure the space between the dots were even and thankfully circles are a bit more forgiving than squares and lines probably are. A special way that saved us some measuring was using masking tape to ensure the dots all lined up properly and this technique was possible  on every second row. 
In total this small wall took dad and I about an hour to lay, though the hardest part was probably getting into the smaller spaces with my increasingly large baby belly. If you look closely at some of the dots they are slightly crinkled and showed up imperfections in the wall. However when all the dots were laid down, you really don't notice the imperfections.
It's funny that this space is the most out there in our house so far but I'm feeling more adventurous now I have an unusual room. I love having a house which I don't think I'll be moving from anytime soon and can just personalise and have fun with. And if one day if I change my mind, the dots should be pretty easy to  remove.
Lisa x
* I made the artwork in the hallway, for a diy how to link click here.

Monday, 14 April 2014

I'm living wallpaper free - bathroom update.

Last week, Sue Jason shared with us about creating a minimalist bathroom and now I'm ready to share the start of our bathroom fix up process and how I'm enjoying my bathroom a bit more now. It's cleaner, fresher, emptier and wallpaper frieze free! Hello blank walls.
Every time I had a shower the wallpaper frieze just glared down at me. It was ugly and just made the bathroom feel dirty and dated. I had already removed a lower down frieze and some in the toilet but the bathroom wall is surprisingly high.

Dad and I tried just using a wet warm cloth and scrapper but was sad to discover that the wallpaper frieze had been stuck over another wallpaper which was much harder to remove. This meant we needed to hire a steamer for $39 and get to work removing it. The wallpaper made a big mess as it was removed but it was so nice to see blank (albeit dirty walls).
It was quite a process but then it looked a bit more like this... (I'm not quite sure the photos do justice to how gross the walls were)
I  had always thought I would paint the walls white to be nice and neutral but after thinking about it I realised that the.white paint mightn't be the best choice to make the old white subway tile walls pop and look whiter. I had been eyeing off some minty green bathrooms on pinterest and since I had plenty of sea bubble paint leftover from the nursery I decided to be bold and have a white ceiling with sea bubble walls. I just love how clean and bright the bathroom now feels and looks.
Unfortunately I am still learning how to photograph this space and the wall appear much whiter/apricot in the photos below but they really as mint green as the pictures above.

The bathroom has existing features that I really like- the subway style tiles, added shelf, his/her vanity, large shower with two heads and matching gold handles and hooks. As this is not a finished project yet, I look forward to having shelving to clear away the clutter on the current shelf, in hopes of achieving an even more minimalist look.

I am also considering painting the vanity white as there is a lot of wood in this room. I think painting the vanity might be just enough as painting the two doors and window frame would be too much considering how much other painting is necessary in the house.  I also want to frame the mirrors and add some built in shelving around the his/her mirror to hide the necessary bathroom items that make the space feel more crowded than it needs to be. I am considering getting some artwork too to hang on the space above the other towel rack and give the room a little bit more personality. I know it will be a small picture and need to include white, gold and mint brought together. Right now I'll just enjoy sharing the change with you readers and feeling that bit cleaner and better in the bathroom :-)
Lisa x

Tuesday, 8 April 2014

Minimalist Bathroom Decor.

Today I'm excited to have a guest post for you all about how to create a minimalist bathroom. I've been working on our bathroom, toilet and laundry area for the last few weeks and have been keen to soak up any wisdom to improve my spaces. I'll be sharing where I'm at with these rooms later next week but for now let's meet Sue...


Hi my name is Sue Jason and I am a blogger at My-bathrooms blog. You may follow us on Facebook, Twitter, Pinterest and Google Plus.


Minimalism is a great way to make any room seem bigger and relies on paring down the décor to the bare minimum, keeping only the necessities and those in plain simple shapes with much of the impact of the style coming from the sleek planes and smooth uncluttered surfaces. A minimalist bathroom is attractive, easy to clean and has the added advantage of appearing to be ultra clean and hygienic!
  Color Less


Minimalist décor aims to clear all distractions from view, and for this reason most minimalist bathrooms are decorated in pure white: from the walls to the bathroom fittings. Any accessories – and there will only be a few, with much hidden from view behind doors and drawers – should follow this white theme, to retain the stark and clutter-free look.

Less is Right


Keep toiletries and bathroom products tucked away neatly in cupboards and cabinets. While it is fine to leave a bar of hand soap (or dispenser full of liquid soap) on the basin for guests and family members to wash their hands, try to keep everything else out of sight, as nothing ruins the purity of a minimal look more than a row of toiletries lined up on the edge of the bath or shower!


Signature Piece


If you have the available space a minimalist bathroom is a great backdrop for a free-standing designer bath. Place the elegant bath as centrally as possible (with help and advice from a friendly plumber!) and design the rest of the décor around it to create a wonderfully eye-catching focal point.


Store It


For minimalism to work you need to strip almost everything out of the bathroom, but for the bathroom to work you will need access to towels, soap, shampoo, conditioner and so on. Therefore, your minimalist bathroom must contain plenty of cupboard space so that everything can be put away properly once it has been used! It will take some time and training to get the family in the habit of putting things away after they have finished in the bathroom, but you will be delighted with the end effect once they do have the hang of it!


Minimalism is not for everyone, but if you are keen to try it out in just one room of your home you can do no better than to choose a bathroom for your first effort! Concentrate on removing clutter and opening out the room as much as possible – and do not worry if it does not work at first; you can always tweak the décor until you find a level of minimalism that works for you.

It's great to have Sue share her fabulous ideas. There is so much now I want to think about while planning the items to add to my bathroom and how to keep my bathroom from feeling cluttered.
Lisa x