Wednesday 13 May 2015

Throwing a 60th birthday party for Mum.


It was Mum's 60th birthday earlier this year and we decided to throw her a party at our house. It feels a bit like we are constantly hosting things as we also celebrated Christmas, Grandma's 80th and Henry's dedication at our home. However each new party it feels a little bit easier and a little bit more like we know what to expect. I also am getting a bit of an inventory of party supplies which decreases the amount needed to buy each time. After all what is the point of having a nice home if you cannot share it with others. When we purchased our current home we deliberately looked for open plan living and space to host others.

To decorate for Mum's 60th and make it a little more special we bought pretty flowers and also used balloons- which is where my stash of clear vases comes in handy. As flowers can be costly, I used balloons on sticks in vases to decorate some of the surfaces.


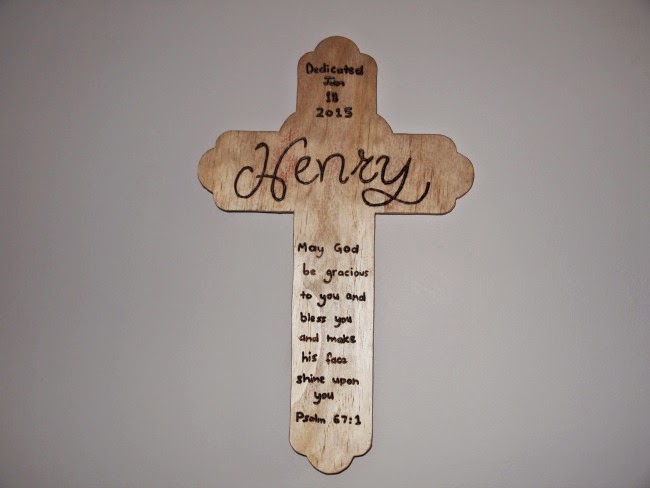
 Every time we have a special celebration at ours I like to also add a few personalise items that are made specifically for the party like Henry's dedication cross and an 80 shaped photo wall for Grandma's 80th.
For Mum I made a photo board which is nothing new but I also made her a special message board (which I've shared about over at Titi Crafty).
Another idea was using helium balloons as decoration.On each of the helium balloons I attached a photograph of Mum at a various stage in her life using pretty washi tape.Then guests could walk through the balloons and look at the different images. As the night progressed though the balloons did start to drop a bit so a good idea would be to pick up the helium balloons as late as possible in the day so they last well into the night. This was such a simple idea which really made the room feel more like a party room- though I should mention that our house has a large open kitchen/dining/living area and also an outdoor atrium so this front room was mainly used for guests to look at photographs and for extra seating while we all ate dinner.

To see Mum so happy and feeling loved as she celebrated with those most dear to her was totally worth the effort! 
Lisa x


Friday 3 April 2015

Easter basket ideas for a baby


It's the first time we will celebrate Easter as a family of three. I love getting crafty and creative for each different holiday, made especially fun now that I have a little one to share it with! I wanted to put together a little Easter basket for Henry (even though he's only 9 months old). In creating a basket, it needed to include items that remind of the true reason why we celebrate Easter; Jesus' death and resurrection, as well as being age appropriate for a baby (i.e no chocolate). Although I did include a couple cute rabbits, I really want Easter for Henry to not be about a bunny that gives chocolate, but a loving Saviour who died to set us free.


The basket was thrifted from an op shop years ago and is finally getting some use. I'd always thought I wanted to do Easter baskets with my future kids. When my brother and I were younger we'd just rummage through the kitchen to find old icecream containers for our eggs. As we grew older these icecream containers got decorated and I hope that in the future Henry and I can make Easter baskets together. 

After some thought I decided to include :

- plastic eggs
I filled one with mini chicken and sealed it with tape. The others contain an animal cracker each and will be fun for Henry to practice opening and closing. These plastic eggs can be found at your local discount store.

- a board book about the Easter story
From the Christian book store.

- a little rabbit I made out of fabric scraps

- a handmade rabbit rattle picked up from a local craft market
This one is much cuter than the bunny I made. I always like to support local crafty folk.

- a drawstring bag (with a cross on the front) that contains felt pictures telling the Easter story.  
These felt pictures were found at the Christian book store. I sewed up a drawstring bag from fabric I already owned and appliqued a cross to the front to make the bag a bit more special. Now that the felt pieces have a place to be stored, hopefully they are less likely to get lost. As Henry gets older we can use these felt pieces to retell the story time and time again.


I hope you have a wonderful Easter celebrating that He is Risen. If you have any future ideas for things to include to Easter baskets, I'd love to hear them.
Lisa x

Friday 27 February 2015

How to organise cards.

I've always been someone who likes everything organised and in its place and I have a box which stores piles of old cards and special notes which I can't bare to part with. However with Henry's birth and the baby shower and dedication, cards were just piling up. I recently read about the idea of not having items that don't spark joy and some people may just throw cards away,  I really treasure them.
I wanted to make sure I kept them in an accessible way so I can refer back to them and keep them together. Too much love and kind words were in these cards to stow them away in the bottom of a box.
After trying several options for organising cards in the past (including gluing cards in notebooks, scrapbooking and using photo albums), I've decided on a favourite way- using hinged rings.
A box of these set me back about $12 from Officeworks but the 30 hinged rings I have should last me through a first, second and third birthdays and then ....30th birthdays.
I used the original invitations as the front covers of the cards and holepunched through them all, before joining the cards using the hinged rings. As we received so many cards when Henry was born that I actually sorted the cards into sizes before hinging them and making three piles. The photo below shows the different books of cards but I haven't shown you the cover invites as they contain personal addresses etc. For Henry's birth cards there was obviously no invitation so I attached a copy of the announcement card we sent out when he was born.


These cards are now stored in a white box on my office shelf- .ready to refer back to if I need a good read and one day Henry and I can read through them together. I will definitely be doing this in the future for when we get cards for other special occasions.
Lisa x
P.s Don't forget to enter the giveaway below, it's still open for a few days :)

Sunny days ahead and a giveaway.

On this here blog I am all about thrifty finds and saving some money while being creative at the same time.
and not skimping on quality. For some time now I have pondered the idea of ordering sunglasses online. Could I actually get decent sunglasses for a cheap price? So when selectspecs.com contacted me to try out their Savannah range sunglasses, I got excited. I am always in need of sunglasses as it is very bright here in Australia at the moment and I am completely awful at remembering where I left my sunglasses. I often refer to it as baby brain but let's be honest, this problem has being going on longer than Henry's existed. I only had one pair and some days I find its too bright just hanging out the washing. A spare pair of sunglasses is always useful. 

So Savannah sunglasses, what are they like? 

When they arrived they had a lovely little case and cleaner with them which was a great as I tend to just throw my sunnies in whatever bag I'm taking and they can get a bit beat up so a nice sturdy hard case included was great. The case was plain black but I couldn't help brightening it up a bit with some floral washi tape. The glasses themselves have strong frames and feel like they have been made from decent material so they should last well. 

I gave them a roadtest wearing them on one of Henry and my walks around the neighbourhood and the protection level was great. No squinting done. Overall I think these are a great extra pair of sunglasses to have and definitely stand up to the Australian sunshine.


The people from selectspecs.com have given me the chance too for one lucky reader to receive a pair of Savannah sunglasses range for themselves. 
This includes free shipping.


This giveaway is open to everyone as selectspecs.com ships worldwide. This giveaway will run until 11.59 p.m on Thursday 5/3/15. Thank you for participating, and good luck.

a Rafflecopter giveaway Disclaimer: While I did not receive monetary compensation for this post, I received one free pair of sunglasses for the purpose of reviewing these items and posting this giveaway. Opinions are 100% mine.

Tuesday 3 February 2015

Lazy cozy days at home.

Since making over the master bedroom with a fresh coat of paint and few new accessories, I've been thinking about how to make it feel extra cozy in there. As a new mum, I have no trouble falling asleep easily but something is just nicer about soft, warm bedding. To make the bedroom extra cozy, it was obvious I needed a light, fluffy duvet, some soft sheets and a few firm pillows. Just looking at the duvet and sheets above just make me want to crawl into bed and snuggle up with a good book and a cup of coffee- especially as Henry's napping in his nursery at the moment. I'm just kind of obsessed with the light, fresh, cozy look of the bedding range from Parachute Home .
A soft bed is really enough to make our master bedroom somewhere I want to be but I've also been experimenting with softer lighting using candles. There is something so soothing and calming about flickering candle light. Friends of mine have recently gotten into hosting candle parties (like a tupperware party but about candles) and the host was going on about her nighttime routine of lighting a few candles as she prepared for bed and using the soft lighting to prepare herself for sleep. Of course she would blow out the candles before going to sleep but the idea of easing yourself to sleep with candles sounds blissful... especially right now as my current bedtime routine consists of tiptoeing into the bedroom when I'm exhausted and entering the bed as quietly as possible, occasionally cursing myself for dropping my phone on the floor or knocking a piece of furniture loudly.  Henry has a real knack for knowing when I'm coming to bed. His little body starts wriggling in the cradle when I enter and often 10 minutes later I hear a faint cry for milk, which if not responded to, proceeds to get louder and louder...
But back to the candle idea, it's definitely one I'll be trying in the future. If you are interested in making your own candles too, here's a link to how I went about making some and used thrifted teacups to contain the wax.
I hear a faint cry in the distance now so it's back to motherly duties for now...but cuddling the little man  is something I'll never complain about.
Lisa x


Friday 30 January 2015

The guest room/office project : the desk area

My latest project is the guest room/office and I thought I'd share with you the creation of my 'new' desk. The desk was a little freebie find which was just the right size for the space I had available in the room. Complete with three drawers, it was in reasonable condition and just needed a  few coats of paint.
The before photos show it after a little bit of mending and sanding had taken place- I'm always to eager to get into these craft projects and forget to take before photos.
I'd found some pretty little gold flower handles on a garage sale for $1 each and they looked quite cute on the finished drawers. I just have a thing for pretty little handles and these were so delicate and smart looking. Once the desk had received the usual treatment- repair, sand, prime and 2 coats of oil based paint (seemed to wear better), the handles were attached and the desk was put inside.
While there were three drawers to fill, it wasn't quite enough so I decided to add some shelving. For the shelving my Dad actually cut some melamine he had a home to size and ironed on white edging. For the brackets we used Ikea EKBY brackets (currently sold for $4 each). These don't come in gold so with some gold spray paint they were transformed (and also a chalkboard frame I already owned). I just love the pop of gold- it just feels like a very classy and nice place for me to work now. I have plenty of spray paint left over now so I'm dreaming up other things I can give a gold makeover.


The top shelf houses beautiful brass giraffes I received as a baby, a favourite Roald Dahl quote and  some storage boxes.
 The middle shelf is home to lots of paperwork including my 2014 memory box and also a little elephant from India.
The bottom shelf is home to some special photographs, prints of Henry's darling little newborn feet and a frame from a previous project that I updated using gold spray paint. There is also a little brass piano from my childhood doll's house...can you sense my eagerness to find any gold items I could in the house and give them a new home? You know you are running short on brass items when you have to raid your childhood dolls house... though every room does need a little quirk in it.

Then on the wall is another old project that was updated to suit the new style of this room. The frame was given a coat of gold spray paint and I just love the end result. It really changed the whole look of the frame.


And there you have it, my new little office nook. While the desk is now in full use (I'm sitting at it right now writing this post), I'm still looking to finish off the workspace a bit more by adding more pieces of paper to my pinboard and working out how best to use the desk space. I am also working at finishing off the rest of the room and look forward to sharing other progress around the room soon.
Lisa x

Thursday 22 January 2015

Henry's dedication.

My husband and I are practicing Christians and had a dedication ceremony for our son, Henry, recently. A dedication is a chance to declare our intent to raise our child as a Christian. It was a special day for our family and I wanted to make Henry a little cross to remind him. I used an existing cross that I had and my dad helped to cut out the cross shape once the lettering had been done.

To make a cross (or other shape) similar to this you will need:
a pencil
a cross shape template
a piece of plywood
a soldering iron
a fretsaw (or someone kind to cut it out for you)
sandpaper


Once I had decided what I wanted it to say I wrote it out in pencil. I have average handwriting but it is a special handmade item for Henry from me. Once I was happy with the text I used a soldering iron to write over the pencil and burn the text into the wood. Since the verse I'd chosen was quite long it took a few hours but is a fairly therapeutic peaceful activity to do while baby sleeps.

My dad cut out the shape for me and we added a hook on the back to hang it with.I hope we can use the cross with Henry when he's older to discuss the meaning and reason behind his dedication. I've also included a few other photos of decorations from the day. They're fairly basic decorations as I'm time poor at the moment but added to the special feel of the day.


Lisa x